
Azure deployment slots are a fantastic feature of Azure App Services. They allow developers to have multiple versions of their application running at the same time with the added bonus of being able to re-route traffic between each instance at the press of a button. They can, however, generate a lot of confusion if you don't fully understand how they work.

So what exactly are Azure Deployment Slots?
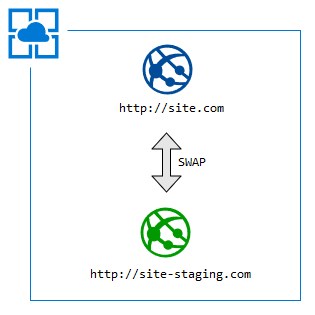
Let's assume we have a web app running on Azure App Services. We'll call it http://site.com. When you create a new web application, Azure creates a deployment slot for you, typically called production. However, it's possible to add additional deployment slots.
Put simply, a deployment slot is another web application. It has it's own URL, it could have its own database, connection strings, etc. It can be configured any way you see fit. But why would you want to have two web applications? The most common reason is so that we can have a place to deploy new features to, rather than going straight to production, which can be a little risky.
To accomplish this, we would create a deployment slot called staging. The staging slot is where you would deploy all new changes to your application to validate that everything is working before the changes actually go live to your users. Think of it like a test environment. A test environment that's really easy to spin up and manage. Let's create a deployment slot called staging and have it be accessible via http://site-staging.com
Creating a Deployment Slot
Creating a deployment slot is pretty simple. Open your Azure portal and navigate to your Web App resource. Once there, you should be able to see a menu item labeled Deployment slots.
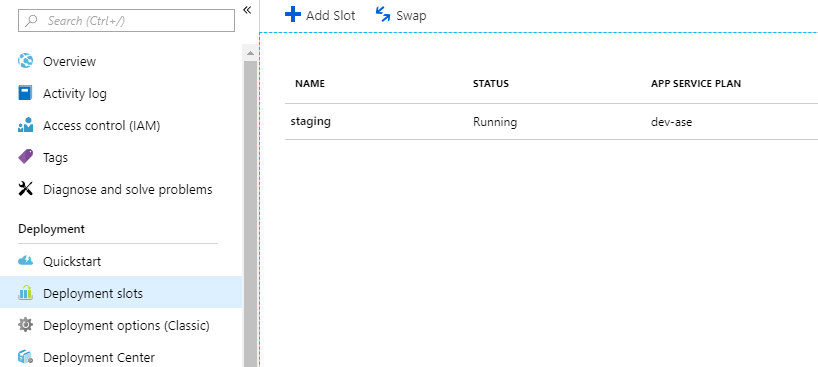
Clicking on the Add Slot button opens the space to add a new deployment slot. Here you can specify the name of the slot (I used staging) and if you want to copy any pre-existing configurations (such as your current production deployment slot). Press OK and you're all set!
When the deployment slot is first created, it is empty. So you'll want to deploy your latest and greatest changes to your staging environment (or just re-deploy your current production version to get something up and running). Deploying to your new slot is really no different than deploying to your production slot. Using the same tooling, just select the staging slot, rather than the production slot.
At this point, we have two instances of our web application running. One is our production instance, supporting all of our production traffic and another staging environment that we are using for testing the latest and greatest features. When you are satisfied with your tests, you will need to swap the staging and production slots so that your users can benefit from your new features.
Swapping Deployment Slots
Swapping deployment slots routes traffic from the source slot to the target slot. In our case, we want to swap the staging and production slots. This will route our users to the staging app (where our newest changes are) when they navigate to http://site.com.
While that is the easiest way to describe what is happening, there is a lot that is going on behind the scenes that is useful to know.
When Swapping... Source and Target Matter
When performing a swap, you are presented with a source and a target. This may be a little confusing at first. Why would it matter? A swap is just flipping two things! While the end result will be the same, the key takeaway is that up-time is not guaranteed for the source slot.
This is because when you perform a swap, this is what is really happening:
- First, the staging slot needs to go through some setting changes. This causes the staging site to restart, which is fine.
- Next, the staging site gets warmed up, by having a request sent to its root path (i.e. '/'), and waiting for it to complete.
- Now that the staging site is warm, it gets swapped into production. There is no down time, since it goes straight from one warm site to another one.
- Finally, the site that used to be production (and is now staging) also needs to get some settings applied, causing it to restart. Again, this is fine since it happens to the staging site.
This process guarantees that your destination slot will always been warm and your users won't experience any downtime when the swap happens. Users may experience performance issues when navigating to the staging environment, but this is acceptable as it's not really a production environment.
When Swapping... Settings Are Swapped Too
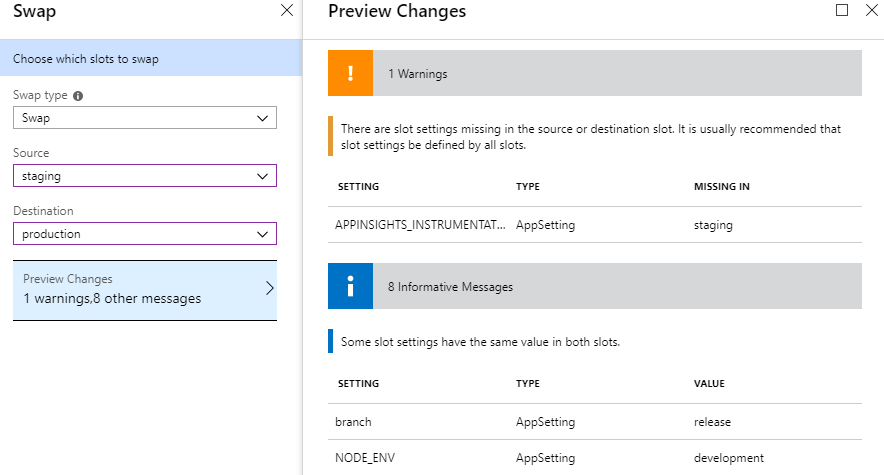
Spoiler Alert: Not all settings are swapped. It is important to remember that when performing a swap, the settings of a deployment slot are also swapped.. but not all of them.
Some settings make sense to keep specific to the slot, these are called slot settings and can be configured in the Azure portal.

When a setting has been flagged as a slot setting it will not be applied to the target site. This is useful for settings such as connection strings. Maybe you want to have a dedicated database for your staging environment so you create a slot setting to hold a connection string that connects to a database specifically set up for your staging environment.
Some settings will be swapped during the swap process. There are settings that are not marked as a "slot setting" under the Application Settings section. This can be useful for a couple of reasons, one of which could be to introduce a new slot setting.
If at first we apply the setting to staging, perform the swap, and then apply the setting to the staging environment again (the old production app), it's possible to add a new settings without incurring an application restart on the production application.
The Azure portal even tells you which settings will be applied before you perform the swap operation as shown below.
When Swapping... The Code Does Not Move
This was something I wasn't always quite sure about until I dug into it a little more and ran some of my own experiments. When you deploy changes to a deployment slot, that is where the changes will forever reside until you deploy over them. Consider the following scenario:
Version 1 of your application is deployed to your production deployment slot.
Version 2 of your application is deployed to your staging deployment slot.
As we learned previously, each deployment slot is its own web application. When a swap is performed, Azure swaps the virtual IP address of the source and destination and applies the appropriate settings. The code stays with their respective web applications, so the staging web app effectively becomes the production web app, and the production web app becomes the staging web app.
Put another way, imagine having two boxes. One box has black licorice it in labeled "production", and the other box has KitKats inside of it labeled "staging".
Note: To get this analogy right, you just need to agree that KitKats are the superior candy.
Your customers are currently going to the black licorice box, but you realize it's time to give them an upgrade. So you swap the location of the boxes. You also swap the labels on the boxes. This puts the "production" label on the KitKat box and the "staging" label on the black licorice box. Directing your customers to the box of delicious KitKats. They obviously rejoice.
Admittedly, it's sort of a silly example, but I hope it clears up the fact that when you perform a swap, we aren't picking up whats inside the box and moving them to a different box. We're simply relabeling the boxes themselves.
Rolling Back Changes
If the ability to be able to test your changes before going live isn't enough of an incentive to begin leveraging deployment slots, the ability to roll back your changes at the press of a button should be enough to convince you.
After performing a swap, our users are now hitting the latest version of our application. If for some reason we missed something and we start noticing errors, all we have to do is swap again to put the system back into its previous state.
There's no need to open up Git, revert the commit, and re-deploy the change. We don't need to deploy anything at all! It's just a matter of routing our users back to the site that was working for them previously.
Testing in Production
There's also this nifty little feature that we can leverage called Testing in Production. Testing in Production is essentially Azure's implementation of a canary test. If you're unfamiliar with the term, it stems from the mining days where miners would bring a canary down with them into the mine. If the canary died, they'd know something was wrong with the air quality, warning them to leave the mine as soon as possible.
We do canary testing by routing a small subset of users to our new feature. Continuing with the production and staging examples, what we do is take 5% of all traffic to our website and actually have them go to our staging environment with the remaining 95% continuing to hit our production environment. If we don't notice anything wrong, we can bump the 5% up to 10% or even 20%, until we've reached 100%. This way if anything were to go wrong, we've mitigated the number of users impacted by a bad change.
If you're interested in trying this feature out, it is relatively simple to get going. Simply click on the Testing in Production menu item from within your App Service.
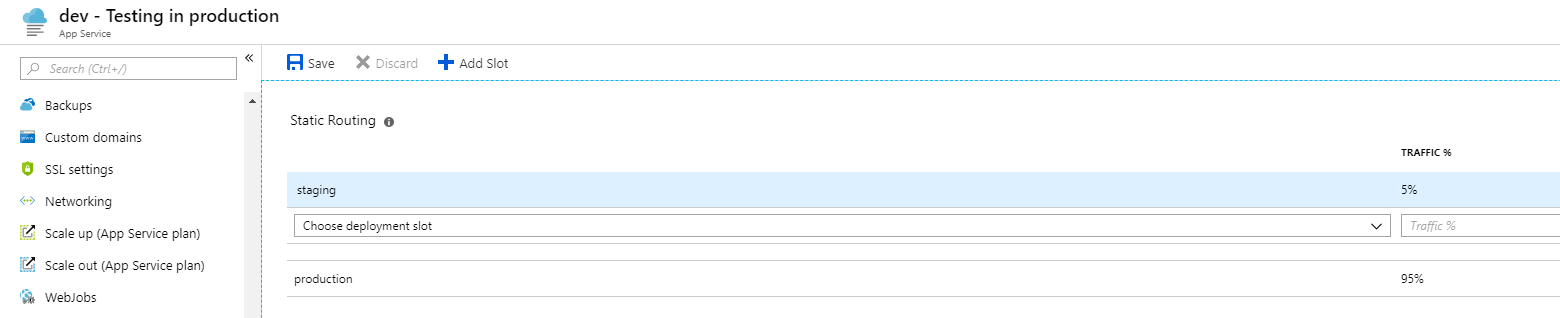
This will allow you to set the percentage of traffic that you want to see going to your staging slot (5% as shown in the figure) and production slot. That's all there is to it!
Wrapping Up
Deployment slots are incredibly easy to use and offer a wide range of features that make them hard to pass up. If you're hosting your application in Azure, definitely consider them for your current and/or next project!